
Understanding the Round Face Shape
Before diving into contouring techniques, it’s crucial to understand what characterizes a round face and how it differs from other face shapes.
Key Features of a Round Face:
- Full cheeks: The widest part of the face is typically at the cheeks, giving a soft, circular appearance.
- Equal width and length: The face tends to be almost as wide as it is long, creating a rounded silhouette.
- Soft jawline: The jawline is less defined, with minimal angularity.
- No prominent angles: The face lacks sharp, angular features, often appearing softer and more youthful.
Goals of Contouring a Round Face:
- Create the illusion of length: Make the face appear more oval or elongated.
- Define the cheekbones: Lift and sculpt the cheeks to add dimension.
- Slim the jawline: Minimize the roundness of the jaw for a more chiseled look.
- Add dimension: Avoid flatness by enhancing natural shadows and highlights.
Step-by-Step Guide to Contouring a Round Face
Contouring is about creating shadows and highlights that play with light to reshape your facial features visually. Here’s a step-by-step process tailored for round faces:
1. Prepare Your Skin
- Start with a clean, moisturized face: Proper skin prep ensures smooth makeup application.
- Apply primer: Use a primer suitable for your skin type to create a smooth base and prolong makeup wear.
- Apply foundation: Use a foundation that matches your skin tone for an even complexion.
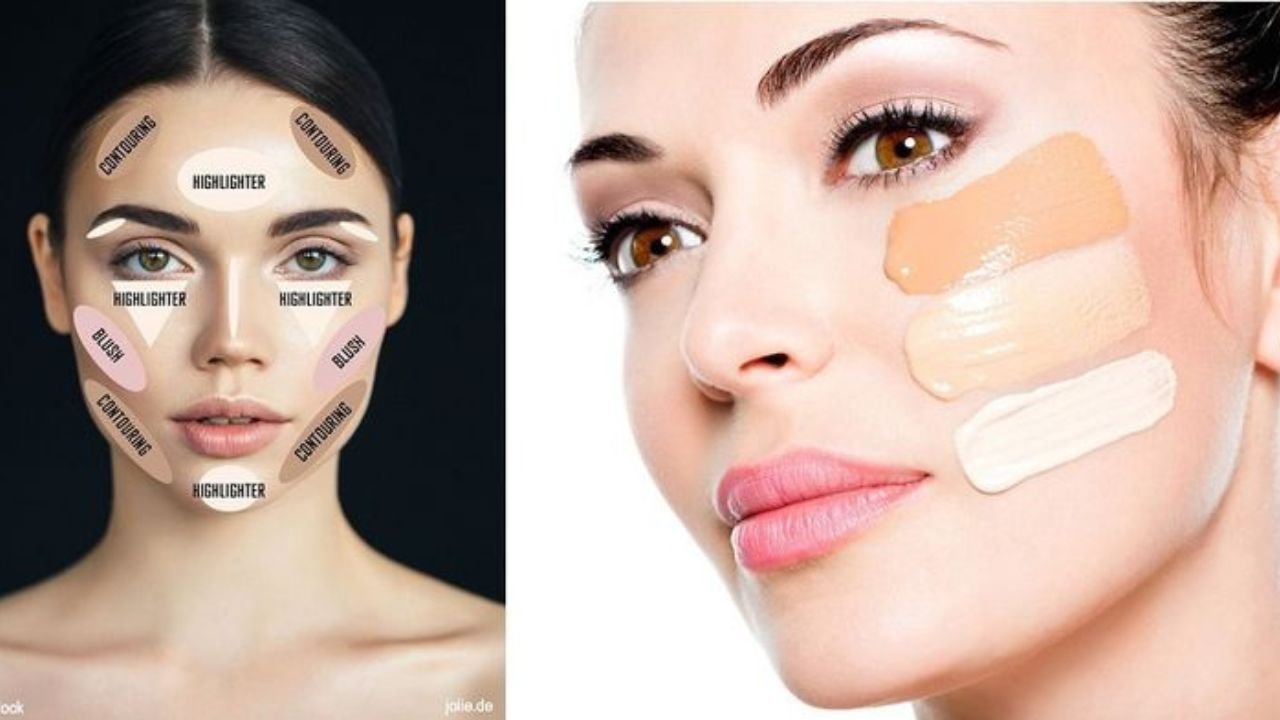
2. Highlighting (Lifting and Brightening)
Highlighting brings forward the areas you want to emphasize and creates contrast with the shadows.
- Center of the forehead: Apply a luminous highlighter or concealer.
- Under the eyes: Brighten dark circles and lift the area.
- Bridge of the nose: Lighten this area to elongate the nose visually.
- Cupid’s bow and chin: Highlight to draw attention to these features.
- Center of the chin: Lighten to create a balanced look.
3. Contouring (Shadowing for Dimension)
Contouring adds shadows that help sculpt the face, creating the illusion of a more oval, elongated shape.
- Along the sides of the forehead: Apply a contour shade slightly darker than your skin tone to minimize width.
- Under the cheekbones: The most critical area. Suck in your cheeks to find the hollows, then apply contour from the ear towards the corner of your mouth, stopping about midway.
- Along the jawline: To slim and define, apply contour from the ear down to the chin, blending downward.
- Sides of the nose: Light contour here can help narrow the nose if desired.
- Temples: Lightly contour to add dimension and reduce the appearance of width.
4. Blending Techniques
- Use a clean, fluffy brush or beauty sponge to blend all contour and highlight shades seamlessly.
- Blend in circular motions to avoid harsh lines.
- Pay special attention to the hairline, jawline, and cheekbones to ensure a natural transition.
- Remember, the goal is subtle shadowing, not heavy lines.
5. Setting the Makeup
- Set your makeup with a translucent or setting powder to prevent creasing and increase longevity.
- Lightly dust the powder over highlighted areas to set them in place.
- Use a translucent powder or a shade slightly lighter than your skin tone for contour areas.
6. Final Touches
- Add a natural blush to the apples of your cheeks and blend into the contour and highlight.
- Optional: Use a setting spray to lock everything in place and enhance a natural glow.
Specific Techniques for Contouring a Round Face
Different techniques can be employed depending on the desired look—whether subtle definition or a more sculpted appearance. Here are some tailored techniques:
A. Enhancing the Length
- Focus on highlighting the center of the face: forehead, nose bridge, chin.
- Contour the sides of the forehead and jawline to minimize width.
- Use vertical highlighting and contouring lines to elongate the face visually.
B. Slimming the Cheeks
- Apply contour directly beneath the cheekbones, starting at the ear and blending inward.
- Keep the contour slightly above the natural hollows to lift the cheeks.
- Avoid placing contour directly on the apples of the cheeks to prevent adding roundness.
C. Defining the Jawline
- Use a darker shade along the jawline to create a more angular appearance.
- Slightly contour under the chin to reduce roundness and create a more defined profile.
D. Lifting the Face
- Highlight the center of the forehead, under the eyes, and the chin.
- Contour the sides of the face and jaw to add shadow and depth.
- Focus on creating an upward motion with your contour lines to lift the face.
Best Products for Contouring a Round Face
Choosing the right products is essential for achieving a natural, sculpted look. Here are some recommendations:
Contour Products
- Cream Contour: Offers a blendable, natural finish. Recommended for beginners and dry skin.
- Charlotte Tilbury Hollywood Contour Wand
- Fenty Beauty Match Stix Matte Contour
- Anastasia Beverly Hills Contour Stick
- Powder Contour: Easier to control and ideal for oily skin.
- Benefit Hoola Matte Bronzer
- NYX Professional Makeup Matte Bronzer
- Charlotte Tilbury Filmstar Bronze & Glow
Highlight Products
- Liquid or Cream Highlighters: For a natural, dewy glow.
- Becca Shimmering Skin Perfector Liquid
- Charlotte Tilbury Hollywood Beauty Light Wand
- Fenty Beauty Killawatt Freestyle Highlighter
- Powder Highlighters: Buildable glow, suitable for all skin types.
- Anastasia Beverly Hills Amrezy Highlighter
- Hourglass Ambient Lighting Powder
Tools for Contouring
- Contouring Brushes: Angled or tapered brushes help define precise areas.
- Blending Brushes: Fluffy, soft brushes for seamless blending.
- Beauty Sponges: Damp sponges aid in diffusing product for a natural finish.
- Stippling Brushes: For controlled application and blending.
Tips and Tricks for Contouring a Round Face
1. Use Matte Products for Contour
Matte shades add depth without emphasizing texture or shine, helping create a natural shadow effect.
2. Keep Contour Slight and Buildable
Over-contouring can look harsh. Start with a light hand and build gradually for a natural effect.
3. Focus on Vertical Lines
Vertical contouring lines elongate the face visually, making it appear slimmer.
4. Highlight Strategically
Highlight the high points of the face that naturally catch light—center of the forehead, cheekbones, brow bones, and chin—to draw attention upward and create a lifting effect.
5. Blend, Blend, Blend
Seamless blending is key to a natural-looking contour. Use clean brushes or sponges to diffuse harsh lines.
6. Aim for Balance
Contouring should enhance your features, not overpower them. Keep the look balanced and natural.
7. Practice Symmetry
Check both sides of your face frequently during application to ensure symmetry.
Common Mistakes to Avoid
- Using Too Dark Contour Shades: Dark shades that are too intense can look unnatural.
- Heavy Hand: Applying too much product at once can be difficult to blend.
- Ignoring Blending: Harsh lines ruin the natural illusion.
- Overcontouring: Excessive shadowing can make the face appear smaller or distorted.
- Not Considering Lighting: Remember that contouring looks best when it mimics natural shadows.
Customizing Your Contouring Routine
Every face is unique, and contouring techniques should suit your specific features and desired outcome.
For a Softer, More Natural Look:
- Use light contour shades and minimal highlighting.
- Focus on subtle shadows under the cheekbones and along the jawline.
- Keep blending for a seamless finish.
For a More Defined, Sculpted Look:
- Use slightly darker contour shades.
- Emphasize cheekbone hollows and jawline.
- Incorporate stronger highlighting on high points.
For Special Occasions or Photography:
- Enhance contour and highlight for more dramatic effects.
- Set with a powder to ensure longevity.
- Consider adding a pop of highlighter on the inner corners of the eyes.
Maintaining Your Contour Look Throughout the Day
- Set with Powder: Use translucent setting powder to lock in the makeup.
- Use a Fixing Spray: Spritz to meld everything together and add a natural glow.
- Touch-up Tools: Keep a small brush and powder or stick highlighter in your bag for quick refreshes.
Final Thoughts
Contouring a round face is about creating the illusion of shape and dimension, emphasizing your natural beauty while subtly reshaping your features. With patience, practice, and the right products, you can master techniques that enhance your face’s natural structure, making it appear more elongated, sculpted, and balanced.
Remember:
- Start light and build gradually.
- Focus on vertical, upward motions to lift the face.
- Blend thoroughly to avoid harsh lines.
- Tailor your contouring to your personal features and desired look.
Confidence is key—practice makes perfect, and over time, contouring will become an intuitive part of your makeup routine. Embrace your unique beauty, and use contouring as a tool to enhance and celebrate it.